
Zinnias are adorable annual plants with brightly colored blooms. These flowering plants are easy to grow from seed, and can also be propagated by taking cuttings from your seedlings. Learn how to grow zinnias from cuttings, and expand your zinnia garden.

Zinnias are great cut flowers, and are an excellent choice for taking cuttings. Within a month from planting your first cut stems, you will have new plants for planting.
The stems are easy to root once you take the cuttings, and plant them using the right techniques. The key strategy is to keep the stems nice and moist while they take hold, and begin to set their new roots.

Read along to see just how easy it is to increase your zinnia stock, in the easiest way possible, by rooting zinnia cuttings.
The Advantages Of Growing Zinnias From Cuttings
Zinnias are very easy to grow from seed, and if you have lots of seeds, this is probably the easiest way to grow lots of plants for your garden.
However, if you have a limited amount of zinnia seeds, or you want to grow more of a specific variety that you don't have more seeds for, then taking cuttings is the way to go.
Growing zinnias from cuttings is an easy propagation method, with great results.

Growing Zinnias From Cuttings
Materials You Will Need
To grow zinnias from cuttings you will need:
- scissors
- rooting hormone, powdered or liquid (optional)
- a container with drainage holes or a seed planting cell tray
- good seed starting mix
- a glass of fresh water
- a skewer or similar object for making holes

Cutting The Stems
One of the best times to take zinnia cuttings is when you are pinching back your seedlings, at the beginning of the growing season. However you can also take them at any time during the growing season as well.
It's often easier to work with long stems, however shorter stems will work as well.
I often take cuttings from coveted varieties that I want more of in the garden.
Choose stems without flower buds or flower heads if possible. If they do have buds or flowers, just remove them, because you want the plant's energy to go into the formation of roots, rather than flower production at this time.

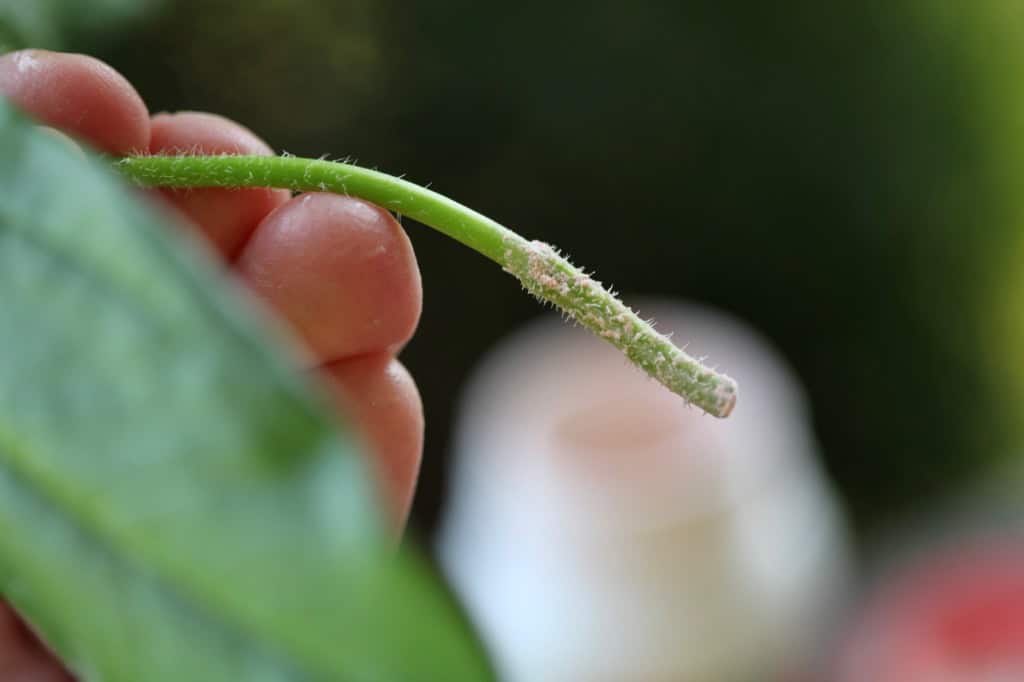
To take the cutting, cut the top of your selected zinnia stem down to just above the third set of leaves.

Preparing The Stems
Now that you have the cutting, remove the lower set of leaves from the stem. This is where the cutting will begin to produce new roots, however it can also root from the bottom of the stem as well.
Cut the top leaves in half, which is helpful to prevent transpiration, or moisture loss. The cutting does not yet have roots to replace any moisture loss, so this technique will minimize this loss.
Place the cutting in a glass of fresh water, until you are ready to plant. This will prevent wilting, especially if you are taking multiple cuttings, and are not ready to plant right away.
The stem cuttings can remain in the water for days, and will even begin to produce roots if left in the water long enough.


Planting The Stems
Fill your container with the seed starting mix. I use cell trays for multiple plantings. Dampen the mix before planting.
Take a zinnia cutting and dip the cut end into rooting hormone, making sure to cover the leaf nodes where the lower leaves were removed.
I like to use rooting hormone to help stimulate root formation. This is an optional step however, as some gardeners have great success without using the rooting hormone.
Make a hole in the soil into which to insert the stem. You can use a pencil or a skewer, or similar object to make the hole.
Insert the cutting into the soil, making sure to cover the leaf nodes where the leaves were removed.
Firm the soil around the cutting.


Caring For Zinnia Cuttings
Caring for zinnia cuttings is a little different than caring for the zinnia seedlings grown indoors.
In fact, if you have taken cuttings from plants that are already hardened off, you can actually care for the plants in the outdoor environment, with some conditions.
If caring for more tender cuttings indoors, place under grow lights indoors. Keep them well watered, until the cuttings are growing and have formed roots, and are ready to be hardened off outdoors.
If caring for cuttings from hardened off plants outdoors, place your containers in a more protected outdoor spot initially, while the new roots are forming.
I placed my trays of cuttings on a covered porch, where the plants would still be exposed to some weather elements, like wind and early morning sun.
Water regularly to keep the soil moist while the roots are forming. Bottom watering is best.
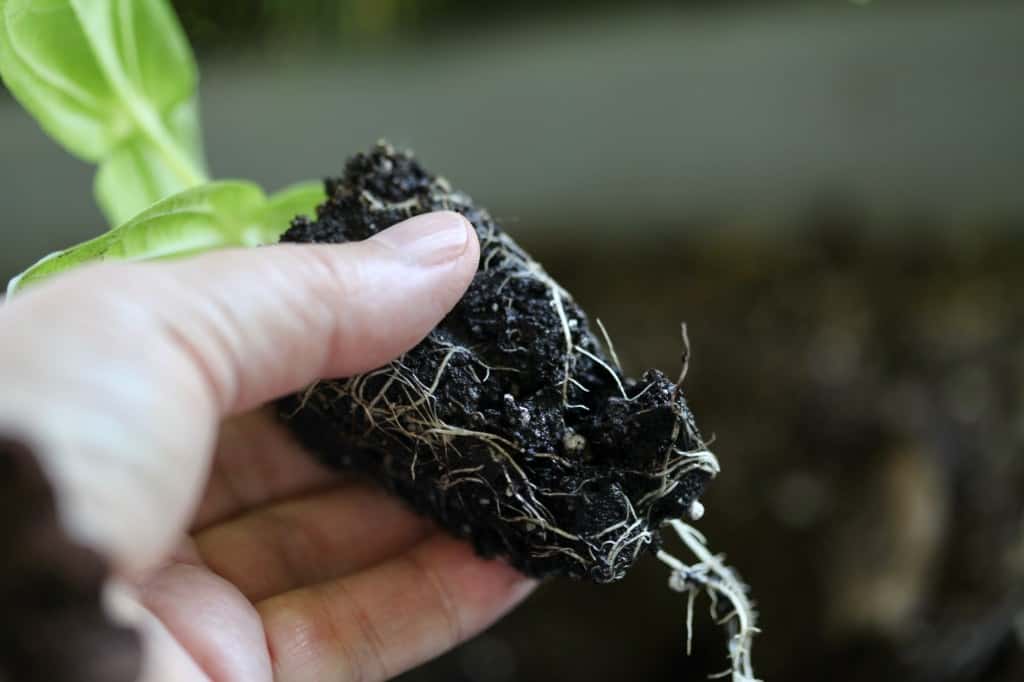
Within one to two weeks or even earlier, you will begin to see new growth on the successful cuttings. Those that do not take will wither. Just remove these remnants, and focus on your new babies.


Transitioning To The Garden
When the cuttings are big enough, about 4 to 6 inches high and growing, they can be planted into the garden. You will often see the new roots coming out of the drainage holes in their containers, as evidence of your success.

Make sure to harden off any cuttings grown indoors, before planting in the garden.
Plant in a sunny spot, in fertile well-drained soil, full of organic matter. Space the plants at least 9 inches apart to promote good air circulation.
You can also plant your new zinnia plants in containers. These flowers do very well growing in containers and pots.
Make sure to plant at the same soil level as the plants were growing in their containers.
Water in well, and water regularly while the plants are getting established in their new location.
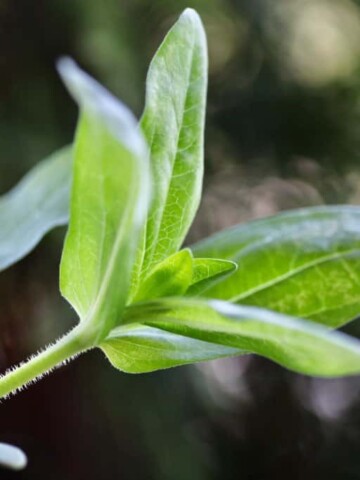
When your cuttings take hold, they will grow as well as the original plant, grown from seed. What a fabulous way to make two for the price of one.

Frequently Asked Questions
Can You Root Zinnia Cuttings In Water?
Yes, zinnia cuttings are easily rooted in water, and can develop roots within one to two weeks.
How Can I Encourage My Cuttings To Root?
By following the basic steps for growing the zinnia cuttings, this should stimulate rooting. Any cuttings that remain green after a week are likely developing roots. Those that wither and shrivel, are likely beyond rooting successfully.
If by chance the cuttings have withered because of lack of moisture, and you catch them early, they might be able to be saved. Try bottom watering, and give them a good soak for several hours, to see if they will bounce back.
If they are in the garden, give them a good watering, to see if they can be revived.
Otherwise, just continue to care for them, and if they show evidence of growth, they will have rooted successfully.
Can You Directly Plant Cuttings In The Garden?
Yes you can plant zinnia cuttings directly into the garden, if the stems are sturdy and hardened off. Use the same techniques as described above, and keep the cuttings well watered while they are rooting.

Conclusion
Growing zinnias from cuttings is a rewarding gardening technique that allows you to grow more of your favorite zinnia plants.
The stems root very easily with the right technique, and within just a few weeks you will have new zinnias growing.
By following the step-by-step instructions outlined in this guide, you can successfully propagate zinnias and enjoy continuous blooms all summer long.
You can also share your blooms with friends and fellow gardeners, who have been admiring your flowers.
With a little patience and care, your cuttings will thrive, and your garden will be a testament to your green thumb. Happy gardening!

Have you ever tried to grow zinnias from cuttings? Be sure to leave a comment below to share your experience!
Other Posts You May Like:


PIN IT FOR LATER!


Leave a Reply